CanonEOSLib. Adobe Air Native Extension.
CanonEOSLib is an Adobe native extension for Windows that allows to control a Canon DSLR camera from an Adobe Air application. The following features are supported:
- Read or modify camera settings: Iso, Metering Mode, AeMode, Av, Tv, Image Quality, Exposure Compensation.
- Take pictures and save them on the file system.
- Press the shutter in three different ways.
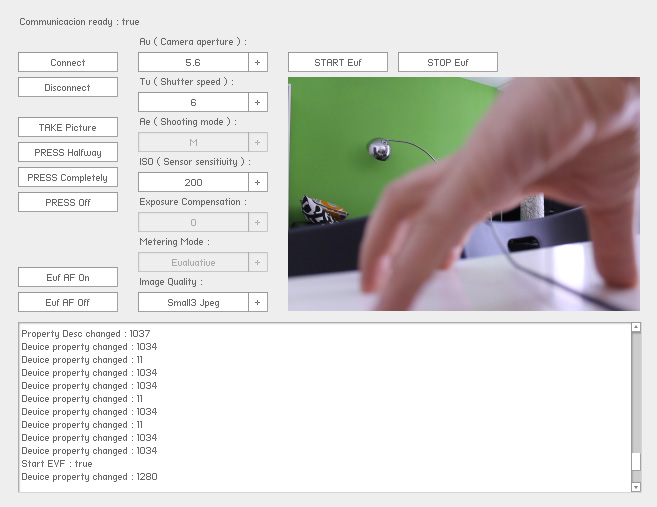
- Capture the Live Preview signal.
- Change Live Preview focus.
Starting communication with the camera
Using the following code we create the extension and we obtain a CanonEOSCamera object. This object represents a remotely connected camera and it is used to pass commands or to retrieve setting values. If multiple cameras are connected, we’ll get access only to one of them.
// init camera object
var canonLib: CanonEOSLib  = new CanonEOSLib();
var camera Camera: CanonEOSCamera = canonLib.getCamera();
camera.addEventListener(StatusEvent.STATUS, onChangeStatus);

// release camera object
camera.removeEventListener(StatusEvent.STATUS, onChangeStatus);
camera.release();
canonLib.dispose();
Read or modify settings
In order to read or modify the camera settings there are three kind of methods we can use:
- Read the setting value, for example getIso()
- Get the possible values related with a setting, these values change according to the camera model, current mode, etc. For example, if we set the camera to manual mode the setting values of ISO, Image Quality among others will be enabled and ready to modify, however, in video mode the only setting enabled is Exposure Compensation.
- Define a new value. For example setIso(newValue : uint). This new value must be in the list of possible values, if not, the camera will ignore the command
For example, to obtain the current ISO value:
// get the current value
var currentIso: unit  = camera.getIso();

// get possible values
// EDSDKTypes.kEdsPropID_ISOSpeed is
// a constant value representing the parameter Iso
var possibleValues: Array = new Array();
camera.getCameraPropertyDesc(EDSDKTypes.kEdsPropID_ISOSpeed,
                             possibleValues);

// set new value
var newIso: uint = 0x48;
var result: Boolean = camera.setIso(newValue);
The functions available to read or modify camera settings are:
// ISO
getIso()
setIso(newValue: uint)
// Aperture
getAv()
setAv(newValue: uint)
// Velocity
getTv()
setTv(newValue: uint)
// AeModes ( Program, Manual, ...)
getAeMode()
setAeMode(newValue : uint)
// Metering mode
getMeteringMode()
setMeteringMode(newValue : uint)
// Image quality
getImageQuality()
setImageQuality(newValue : uint)
// Exposure compensation
getExposureCompensation()
setExposureCompensation(value : uint)
Available commands to execute
Take a photo and save it in a given location:
camera.takePicture("c:\Temp\test.jpg")Press the shutter button in three different ways:
pressingHalfway()
pressingCompletely()
pressingOff()
Start and stop LiveView and automatic focus:
// start liveView
camera.startEVF();
// start automatic focus
camera.evfAFOn();
// stop automatic focus
camera.evfAFOff();
// get liveView and draw it on bitmap object
var bmd : BitmapData = new BitmapData(camera.getEvfWidth(),
                                      camera.getEvfHeight(),
                                      false,
                                      0xffffff);
var bm: Bitmap = new Bitmap(bmd);
addChild(bm);
camera.getEVF(bmd);
// stop liveView
camera.endEVF()
The getEVF(bitmapData) method captures the content visible on the Live Preview screen if it is active. To obtain a video sequence, the method should be called every time the camera dispatchs an EvfDataChanged event. This type of event notifies us the content of Live Preview has changed.
Events dispatched by the camera
The camera generates different events to notify us changes in settings values. The following types of events are supported:
- PropertyChanged: a setting has changed
- PropertyDescChanged: the possible values related with a setting have changed
- EvfDataChanged: the Live Preview screen has changed
- DeviceBusy: the camera is processing an order
- Error: the last command has failed
- Other: information about other events are not implemented
An example:
function onChangeStatus(event: StatusEvent): void {
var propId: uint;
if(event.level== CanonEOSCamera.EvfDataChanged) {
// read new bitmap
} else if(event.level == CanonEOSCamera.DeviceBusy) {
// device unavailable
} else if(event.level == CanonEOSCamera.PropertyChanged) {
// the property id can be read
// inside the variable code in
// the StatusEvent object
propId = uint( "0x" + event.code );
if(propId == EDSDKTypes.kEdsPropID_IsoSpeed) {
// actions when the property
// Iso has changed
var newIso : uint = camera.getIso();
}
} else if(event.level==CanonEOSCamera.PropertyDescChanged){
var newIsoValues : Array = new Array();
propId = uint( "0x" + event.code );
if(propId == EDSDKTypes.kEdsPropID_IsoSpeed ) {
camera.getCameraPropertyDesc(EDSDKTypes.kEdsPropID_Av,
newIsoValues);
// the new values of the parameter uint Iso
// are stored in newIsoValues array
}
}
}How to use Canon libraries
In order to connect the Adobe AIR runtime with the camera is essential to have the Windows libraries provided by Canon. You can get them at Canon program developers. The libraries that you need are: EdsImage.dll, EDSDK.dll, DPPRSC.dll, DPPLibCom.dll and DPPDll.com.
We also require two files related with the Visual Studio: msvcp100.dll and msvcr100.dll or have .Net Framework 4.0 installed.
If we develop an C++ application, a single installer file is generated. This file contains extra files such as dlls and it can be distributed as a whole. In case of an AIR app, we should add the .dll files to the src folder and then use the Flash Builder wizard to include them as part of the executable file.
Conclusions
CanonEOSLib is another example of how to extend the capabilities of Adobe AIR. In the future, the extension could be extended to support multicamera functionality or maybe it could try to repeat the same functionality but using a Nikon camera.